HTTP Caching
HTTP caching significantly speeds up the loading of static objects, such as:
- Images
- Video and audio files
- CSS and JavaScript files
- Documents and other files
Benefits of using HTTP caching:
- Reduced website response time
- Improved access reliability
- Fast loading even for "heavy" pages
Users will be able to quickly load content from any source without delays or interruptions, which will enhance their experience when interacting with your resource.
Setting Up HTTP Caching
Attention!
Please note that there is a system-wide limit of 100 resources per account. If you require additional resources, please reach out to your account manager or contact our support team.
To get started with HTTP caching, follow these steps:
- Navigate to the "CDN" section in the left sidebar
- Select the "HTTP Caching" tab
- Click the "Add Resource" button located in the top right corner
After completing these steps, you'll be prompted to select your preferred Content Delivery Optimization method.

Content Delivery Optimization
When creating a resource, you need to choose one of the following content delivery optimization options:
Static Content
-
Optimizes delivery of images, video files, JavaScript files, CSS files, etc.
-
Text files are compressed (gzip by default) before being served to users.
Large Files
-
Optimizes delivery of large files (larger than 20 MB)
-
Files from the origin are loaded in parts (HTTP Range requests)
-
No compression is performed on the CDN side
-
You can specify the size of the range request slice as an integer from 1 to 1024 MB
-
Default slice value: 16 MB
Note
After changing the slice size when editing a resource, we recommend clearing the resource cache.
Important
Different optimization types have their own limitations:
- Static Content - in the rules, you can enable only one option from the following list: (image optimization, video conversion, Brotli compression).
- Large Files - you cannot enable image optimization, video conversion, or Brotli compression options in the resource or its rules.
Data Source
After selecting the content delivery optimization type, you need to specify the correct data source.

The data source can be:
A domain, for example: www.example.com
An IP address, for example: 86.86.87.88
Example: yourdomain.com:443
When using an S3 domain as a data source, you need to additionally specify the allowed bucket in the corresponding field.
Note: If you have multiple content sources (primary/backup), you'll be able to configure a source pool in the next setup step.
Click the "Create" button to initiate the caching resource creation process. The system will then begin applying the resource settings across the CDN network.
Important
Applying resource settings across our network may take up to 15 minutes.
The resource is ready for use when its status changes to "Active".
How to Use
On the right side of the interface, you'll find an "How to Use" block containing important information:
-
Your Domain: A unique URL for accessing your content through the CDN.
-
Link Replacement: Guidelines for correctly replacing resource links to use the CDN.
-
File Path Example: Demonstration of the proper link format.
-
CMS Integration: Information about plugins for popular CMS platforms.
Configuring HTTP Resource
You can make necessary changes to the resource settings immediately after creating it.
Important
Keep in mind that each configuration change takes up to 15 minutes to apply across the CDN network. During this time, the resource continues to operate with the previous configuration until the update is complete.
Recommendations:
- Carefully review all settings before applying changes
- Plan your changes in advance, considering the application time
- If you're making multiple changes, consider implementing them all at once to minimize overall update time
Resource Configuration

Data Source
If you have multiple content sources (primary/backup), you can add them to a Domain Group and configure the priority for each. If the "highest priority" source becomes unavailable, the CDN network will automatically switch to the next source. It will automatically switch back to the priority source once it's functioning normally again.
You can configure Weight and Max fails for each source.
-
Weight is a numerical value that determines what proportion of requests a specific server should receive. The higher the weight, the more requests will be directed to that server. The default weight is 1.
-
Max_fails - this parameter defines the number of failed connection attempts to a server, after which Nginx will consider it unavailable for a certain period. The default max_fails value is 10.
Use HTTPS for Source Requests
By default, requests to sources are made using HTTPS. Here you can disable the use of HTTPS if needed.
You can also enable source certificate verification by selecting the corresponding option.

Please note
The "Verify source certificate" option is only available when "Use HTTPS for source requests" is enabled.
Specifying an SNI Host
The additional option to specify an SNI host (Server Name Indication) allows you to manually define the hostname sent during the TLS handshake with the origin server. This functionality is particularly useful in the following cases:
- When using virtual hosting, where a single IP address serves multiple domains
- When non-standard configurations are required for specific hosts
- To ensure proper handling of SSL/TLS certificates in multiple-domain configurations. For example, if your origin server hosts both 'example.com' and 'example.net' on the same IP address, specifying the SNI host ensures that the correct SSL/TLS certificate is presented during the handshake.
Hostname for Source Requests
If you're using hosting services such as Wix, Amazon S3, Selectel, etc., please pay special attention to the Hostname section.

Many virtual hosting services (such as Amazon S3) host multiple websites on a single web server. For CDN nodes to access your content correctly, you need to specify the correct Hostname.
Follow these steps if you're unsure about your Hostname:
- Visit your website and right-click on any image to copy its link.
- Paste this link into a new browser window. The resulting domain is your site's Content Source. For example, if your site is hosted on Wix, the content source domain will be static.wixstatic.com
- Go to https://check-host.net and enter your website's domain (not the content source domain).
- On the "Information" tab, look for the "Resource Name" - this is your Hostname. For instance, if you're using Amazon hosting, your Hostname might look like: ec7-54-151-126-156.eu-west-1.compute.amazonaws.com
- Enter this Hostname in your account dashboard
AWS Authorization
You can use AWS authorization when requesting from sources. To do this, select the corresponding option and enter two keys: the access key and the secret key.

Caching
Here you can specify caching times based on response codes (2xx, 3xx, 4xx, 5xx) and set the option to ignore caching control headers ("Expires" and "Cache-Control").
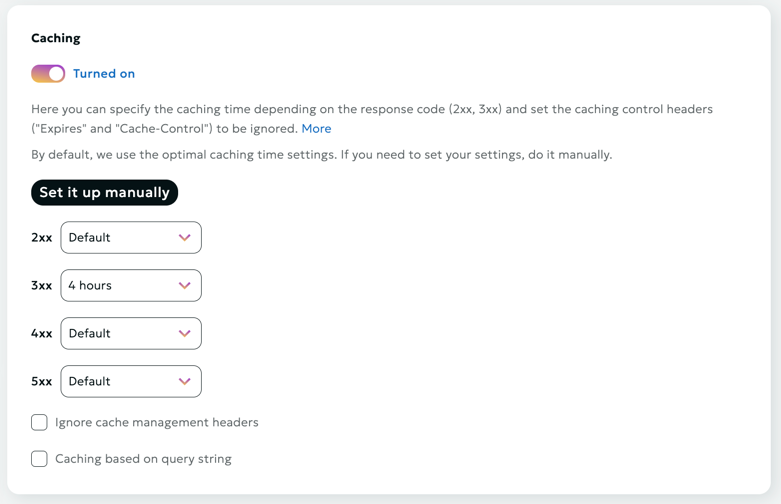
Initially, each user has basic time settings, but these can be customized.
Important
The cache duration settings are specified in seconds
Ignore caching control headers
If the content source (origin) responses already contain Cache-Control and/or Expires headers, caching is performed for the time specified in these headers.
To change this behavior, enable Ignore caching control headers.
In this case, caching will be performed for the time specified in this section.
The specified caching time will also be used for content source (origin) responses that do not contain caching control headers.
Please note
Invalid header values (Expires with a past time, or Cache-control: private) disable caching, which often leads to increased load on the content source (origin).
Using Stale Content in CDN
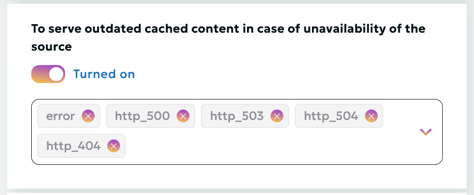
The Use Stale option allows the CDN to serve previously cached versions of content when fetching up-to-date data from the origin server is not possible. This functionality ensures continuous content availability and helps minimize service disruptions for users.
When the "Serve Stale Content on Origin Unavailability" option is enabled, the system will return cached content in the following cases:
- error - an error occurred while establishing a connection with the server, passing a request to it, or reading the response header.
- timeout - a timeout has occurred while establishing a connection with the server, passing a request to it, or reading the response header.
- invalid_header - a server returned an empty or invalid response.
- updating - permits using a stale cached response if it is currently being updated.
- http_500 - a server returned a response with the code 500.
- http_502 - a server returned a response with the code 502.
- http_503 - a server returned a response with the code 503.
- http_504 - a server returned a response with the code 504.
In these scenarios, the user will receive the most recent cached version of the requested resource instead of an error message. This provides a better user experience during temporary issues with the origin server.
Stale conditions
Here you can set a list of conditions to give outdated cached content if the origin is unavailable (the enabled Use Stale setting is required).
List of available options:
- error - an error occurred while establishing a connection with the server, passing a request to it, or reading the response header.
- timeout - a timeout has occurred while establishing a connection with the server, passing a request to it, or reading the response header.
- invalid_header - a server returned an empty or invalid response.
- updating - permits using a stale cached response if it is currently being updated.
- http_500 - a server returned a response with the code 500.
- http_502 - a server returned a response with the code 502.
- http_503 - a server returned a response with the code 503.
- http_504 - a server returned a response with the code 504.
- http_403 - a server returned a response with the code 403.
- http_404 - a server returned a response with the code 404.
- http_429 - a server returned a response with the code 429.
Cache considering query string

When this option is enabled, query string parameters will be taken into account when caching content.
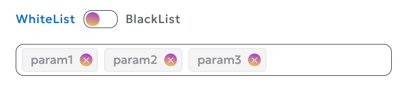
Query string whitelist
The Query String Whitelist defines a list of allowed query parameters (request arguments), which are taken into account when caching. Any query parameters not included in this list are ignored during request processing.
Warning
By default, the Query String Whitelist is empty, meaning that all query string parameters in the request are included in cache key generation and processing.
Query string blacklist
The Query String Blacklist defines a list of disabled query parameters (request arguments), which are taken into account when caching. Any query parameters included in this list are ignored during request processing.
Warning
By default, the Query String Blacklist is empty, meaning that all query string parameters in the request are included in cache key generation and processing.
If you want to redefine whitelist/blacklist, then you need to disable the option "Consider all query string parameters" and set parameter lists.
Warning
You can set only one of the 2 properties: either whitelist or blacklist.
Cache Based on Cookies
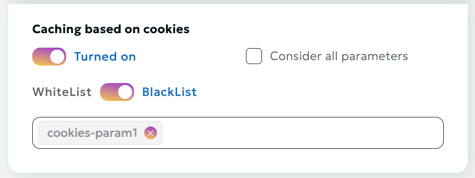
When the "Cache Based on Cookies" option is enabled, the system will take cookie parameters into account when caching content. This allows for the creation of separate cache versions for different cookie values.
Cookies Whitelist
The Cookies Whitelist allows you to specify a list of cookies that should be considered during caching and other cookie-related operations. All other cookies not included in this list are ignored by the system.
Warning
By default, the Cookies Whitelist is empty, meaning that all cookie parameters are included in cache key generation and request processing
Cookies Blacklist
The Cookies Blacklist allows you to specify a list of cookies that should be not considered during caching and other cookie-related operations. All other cookies included in this list are ignored by the system.
Warning
By default, the Cookies Blacklist is empty, meaning that all cookie parameters are included in cache key generation and request processing
If you want to redefine whitelist/blacklist, then you need to disable the option "Consider all parameters" and set parameter lists.
Warning
You can set only one of the 2 properties, either whitelist or blacklist.
This approach helps:
- Avoid cache redundancy
- Retain only the necessary data for personalization
- Optimize storage of dynamic content
CNAME
A CNAME record allows you to assign an alias to a host. This alias typically associates a specific function with the host or simply shortens its name.
By default, your content is accessible at: example.a.trbcdn.net/images/1.jpg
With CNAME, you can set up access at: cdn.example.com/images/1.jpg
-
Creating a CNAME record:
- Open the DNS management page on your DNS hosting site
- Create a new CNAME record with the following parameters:
- Name (Host): "cdn" Note: Some control panels may require you to specify the full subdomain name, e.g., cdn.example.com
- Value: example.a.trbcdn.net. (note the period at the end)
-
Waiting for changes to apply:
- DNS changes may take up to 72 hours to take effect
-
Verifying the setup:
- After the waiting period, check if your content is accessible at the new address
- Use DNS checking tools to confirm the correct setup
HTTPS Delivery via CNAME (SSL Certificate)
By default, after saving the settings, your content will be accessible via HTTPS
The standard URL will look like: https://example.a.trbcdn.net
If you plan to use an SSL certificate, you have two main options:
a) Upload your own certificate:
- Prepare your SSL certificate in advance
- Upload it before or after creating the resource
- Select the uploaded certificate from the list of available ones when configuring the resource
b) Issue a Let's Encrypt certificate:
- Choose the option to issue a Let's Encrypt certificate in the resource settings
- The system will automatically generate and configure the certificate for your resource
Image Optimization $

This feature allows you to optimize image delivery and modify images on the fly.
Important
The service has a file size limit of 2 MB. Files larger than 2 MB will not be processed and will be delivered unchanged. If you need to process files larger than 2 MB, please contact your account manager or support team.
Image Delivery Optimization $
This service allows for on-the-fly conversion of images from JPEG, GIF, PNG (.jpg, .jpeg, .png, .gif) formats to WebP (.webp) format.
WebP is a format that uses an advanced compression algorithm, allowing for size reduction in some images without visible quality loss (by 25-35%).
The WebP format is supported by most modern browsers.
The platform analyzes the Accept HTTP header from the user's request and determines whether the user's browser supports the WebP format:
- If supported, the user receives the image in
WebPformat; - If not supported, the image is delivered in its original format.
Conversion to WebP format occurs automatically in asynchronous mode. This means:
- You don't need to change your web resource's code and/or the format of image links in advance.
- The first request from an end-user whose browser supports
WebPtriggers the image conversion toWebPformat. In response to this first request, the image may be delivered in its original format (to avoid conversion delays). After the conversion is complete, all subsequent requests for this image will receive theWebPversion (if the end-user's browser supports it).
Image Modification $
This feature allows for on-the-fly image modifications at the time of request. Supported file extensions are jpeg, jpg, gif, png, and webp.
Modifications are applied through special URIs in the format /ioss(<modification parameter>=<value>)/
Available modifications:
| Modification | Modification Parameter | Possible Values |
|---|---|---|
| Quality Adjustment | quality |
1-100integer |
| Size Adjustment | resize=<width>x<height>,resize=<width>,resize=x<height> |
1-4000integer (pixels)for <width>, <height> |
| Progressive JPEG | progressive |
y/n |
Quality Adjustment (quality)
- Parameter: quality
- Values: 1-100 (integer)
Request Examples:
https://example.a.trbcdn.net/ioss(quality=70)/example.jpg

https://example.a.trbcdn.net/ioss(quality=1)/example.jpg

Size Adjustment (resize)
- Parameter: resize
- Format:
<width>x<height>,<width>, orx<height> - Values: 1-4000 (integer, in pixels)
Lossless resizing is only possible when reducing the image size.
Request Examples:
https://example.a.trbcdn.net/ioss(resize=400x300)/example.jpg

https://example.a.trbcdn.net/ioss(resize=x200)/example.jpg

Progressive JPEG (progressive)
Allows the image to be rendered initially at minimum quality, then improved as it loads.
- Parameter: progressive
- Values: y/n
Request Example:
https://example.a.trbcdn.net/ioss(progressive=y)/example.jpg
Applying Optimization and Modification
- Enable the "Image Optimization" option in the CDN resource settings
- Use special URIs to apply desired modifications to images
- Test various parameters to achieve an optimal balance between image quality and size
Video Conversion

This service allows you to convert MP4 files for delivery via HLS or MPEG-DASH streaming protocols.
The service can be enabled for the entire resource, or for a specific path (rule).
Important
We do not support the Fragmented MP4 container for this service.
You can check the file container using the command
MP4Box -info test.mp4
Instructions for viewing MP4 files using streaming protocols can be found in the Guide on the resource editing page.

Content Access Restrictions $

In this section, you can set content distribution restrictions based on:
- Country and region
- IP address
- Referer
- User-Agent
- Authorization restrictions
Module Configuration Process
- Activate the type of restriction you need and choose the default rule (deny or allow).
- Add exceptions to the default rule. For geo-restrictions, also select a rule for the exception itself. This way, you can, for example, deny traffic for an entire country while allowing it for a specific region.
- If necessary, set time intervals for the rule's validity. Intervals should not overlap.
- It's possible to add several different rules of each type, provided their time intervals do not overlap.
Authorization by Code Word

Description:
Authorization of user requests is performed exclusively in the CDN network, external resources are not used. The decision to access a resource is made by means of our network based on the criteria specified by the content owner:
- Secret key. It is checked that the link was generated by the content owner.
- The URI of the requested resource. It is checked that the link was generated specifically for this file.
- User's IP address (optional). It is checked that the resource was requested from exactly the IP address for which the link was generated. You can disable the check by selecting the "Do not impose IP address filter" option.
- The expiration time of the link (optional). You can turn off the check by selecting the "Do not impose time restrictions" option.
At the moment the user accesses a protected resource, the content owner needs to generate a special link.
Example:
http://example.a.trbcdn.net/md5(kymJ2w55VH4LUMSKGb6ZqA,1704067200)/path/to/file
The link contains authorization parameter md5(<md5 hash>[,<expires>]):
<md5 hash>- MD5 hash in Base64 format for URL, generated based on secret key, URI of the requested resource, user's IP address (optional) and link lifetime (optional);<expires>is the expiration time of the link in POSIX time format (optional).
When accessing content using the generated link, the CDN calculates the MD5 value and compares it with the received one.
If the MD5 value does not match, then a 403 Forbidden response is returned to the user (access is denied).
If the current time exceeds the value <expires>, then a response with the code 410 Gone (the target resource is no longer available) is returned to the user.
Algorithm for generating an MD5 hash (<md5_hash>) for signing links:
- Form the signature string
<secret_word><path_to_file><ip><expire_time>. The<ip>and/or<expire_time>elements are not added to the signature string ifDo not impose IP address filterand/orDo not impose time restrictionsis specified in the local authorization settings. - Generate
base64_urlviabase64_url(md5(<signature string>)). - Generate the
<md5 hash>signature by performing the following substitutions inbase64_url:- replace the
=character with the empty string''. - replace the
+character with- - replace the
/character with_
- replace the
- Form the link using the obtained signature
<md5 hash>.
Attention
- The domain part of the URI is not used when calculating the hash!
- You can sign part of the path (for example, for /path/to/file, you can sign the file itself, /path/to, /path)
- When generating MD5, the URL should not contain urlencoded characters, but should contain the original characters: cyrillic, spaces, percentages, etc. Then you should request the urlencoded version of the URL with this hash.
- The MD5 hash calculated for HTTP is the baseline for this resource. The same hash will be used for links to a file over the HTTP, HTTPS protocols, despite the fact that the URI for different protocols may differ slightly.
Example of link generation:
-
There are the following input data:
- Secret key:
zah5Mey9Quu8Ea1k - User IP address:
1.2.3.4 - File URI:
http://example.a.trbcdn.net/path/to/file - Expiration time of the link:
1704067200
- Secret key:
-
Form the signature string
<secret_word><path_to_file><ip><expire_time>. Let's assume that we include both IP address and link expiration time.Then the signature string looks like this:
zah5Mey9Quu8Ea1k/path/to/file1.2.3.41704067200 -
Generate
<md5 hash>:PHP example:
$ php -r 'print str_replace("=", "",strtr(base64_encode(md5("zah5Mey9Quu8Ea1k/path/to/file1.2.3.41704067200", TRUE)), "+/", "-_")) . "\n";'
kymJ2w55VH4LUMSKGb6ZqA
Python example:
#!/usr/bin/python3
import base64
import hashlib

secret_word = 'zah5Mey9Quu8Ea1k'
path = '/path/to/file'
ip_address = '1.2.3.4'
expiration_timestamp = 1704067200

def generate_local_signature(secret_word, path, ip_address=None, timestamp=None):
    string_to_sign = f'{secret_word}{path}'
    if ip_address is not None:
        string_to_sign = f'{string_to_sign}{ip_address}'
    if timestamp is not None:
        string_to_sign = f'{string_to_sign}{timestamp}'

    hashed_string = hashlib.md5(string_to_sign.encode()).digest()
    decoded_base64_string = base64.b64encode(hashed_string).decode()
    local_signature = decoded_base64_string.replace('+', '-').replace('/', '_').replace('=', '')
    return local_signature

print(generate_local_signature(secret_word, path, ip_address, expiration_timestamp))
# kymJ2w55VH4LUMSKGb6ZqA
-
Result link:
http://example.a.trbcdn.net/md5(kymJ2w55VH4LUMSKGb6ZqA,1704067200)/path/to/file
Authorization by External Script
External authorization is intended to be able to restrict access to a resource with arbitrary logic described in your authorization script.
The decision on access to content is made based on the response of your script, the link to which you indicate in your personal account when creating/editing a resource.

If the authorization of the script came the reply with a status 200, access to the content is permitted. Otherwise, access is denied.
The authorization script is passed the following headers:
- Host: contains the domain name for which the request is intended;
- X-Request-URI: contains the URI of the requested resource;
- X-Forwarded-For: contains the real IP address of the user who is requesting the resource;
- X-Remote-Addr: contains the IP address of the user who is requesting the resource, or of the proxy server.
Additional content distribution areas $
This option allows you to configure content delivery parameters beyond the main service area.

Connection
- Switch the toggle to
Turned on - Select one or more zones:
- EMEA (Europe, Middle East, and Africa)
- APAC (Asia-Pacific)
- AM (Americas)
- Click the
Applybutton - Wait for some time while the settings are applied to the network
HTTPS Configuration
- Enable HTTPS distribution in the additional zones settings
- Select a certificate from the list of existing ones or upload a new one
Important!
When updating the SSL certificate in the main resource, the certificate in additional distribution zones is not automatically updated. You need to manually update the certificate in the additional zones settings.
When receiving a new certificate:
- Update the certificate in the main resource settings
- Update the certificate in the additional distribution zones settings
Expert settings
Attention!
This section is intended for advanced users and allows for fine-tuning of the CDN resource.
Use HTTP2
HTTP/2.0 protocol is supported by default. Disable this option if support for this protocol is not required.
Use HTTP3
By default, the HTTP/2.0 protocol is supported. Enable this option if HTTP3 support is required.
Use HTTPS Only
If you want to use only the HTTPS protocol, activate this option.
Please note
If you enable content access only via HTTPS, all requests via HTTP will receive a "403 Forbidden" response (access denied).
Automatically Redirect HTTP to HTTPS
By default, your content will be accessible from CDNvideo nodes via both HTTP and HTTPS protocols. However, you can set up automatic redirection using this option.
Please note
If you set up HTTP to HTTPS redirection, requests via HTTP will receive a "301 Redirected" response.
Use Only Modern TLS Versions
By default, all versions of the TLS protocol are used, but you can enable the use of exclusively new versions of the TLS protocol (v1.2, v1.3).

Use Strong SSL Ciphers
You can enable the use of strong SSL ciphers.
This configuration:
- Keeps TLS 1.2 and 1.3 enabled
- Completely disables the outdated TLS 1.1
- Enhances connection security
- Complies with modern cryptographic protection standards
Recommended for production environments with high security requirements.
Please note
This is only available with the "Use Only Modern TLS Versions" option.
Follow Redirects
By default, only responses with 301, 302, 303, 307 and 308 codes are cached when received from your origin. Activate this option to allow following redirect addresses and caching the content.
Search Engine Indexing
Attention!
By default, we exclude CDN links from indexing to prevent search engine bots from seeing a "mirror" of your site. If a bot catches a "mirror" of your site, it may lead to the site being excluded from indexing. Only experienced users are recommended to work with this section.
Using this setting, you can fine-tune the indexing of your content by search engine bots. You can configure proxying of your robots.txt file or upload it from your device to our portal. Before proxying or uploading your robots.txt, we recommend first verifying its correctness on a special resource.

Headers
In this section, you can specify special headers that need to be added when accessing the data source (To source), or when delivering content to end users (For client).

Hide-in-response option
The Hide-in-response option is used to remove specific HTTP headers from the response sent to the client, which can help improve security or reduce unnecessary information exposure.
Timeouts
In this section, you can specify acceptable timeouts for CDN nodes when accessing your origin. If the actual values start to exceed the acceptable ones, a switch to another content source specified in the Data Source section will occur.

Support SSL-protocols
The "Supported SSL Protocols" option allows you to select which protocols should be supported for your CDN resources.

The following protocols are supported:
- TLSv1.1
- TLSv1.3
- SSLv3
- TLSv1
- TLSv1.2
Support HTTP methods
This parameter sets the list of allowed HTTP methods for CDN content. The GET, HEAD, and OPTIONS methods are always allowed, and they cannot be disabled.

The following HTTP methods are supported:
- POST
- PUT
- DELETE
- PATCH
- PROPFIND
- MOVE
- COPY
- LOCK
- UNLOCK
- PROPPATCH
- MKCOL
CORS Check on CDN Side
Description
In some cases, a browser may treat a request to access to certain content hosted on a CDN network as a cross-domain request and block it. It is primarily related to fonts. The issue is addressed by setting CORS (Cross-Origin Resource Sharing) headers for cached objects.
There are two options:
- You can set CORS headers on the origin server and disable their verification in our network yourself.
- You can set up CORS verification in the Your Account section in our network.
Setup in Dashboard
The CORS verification procedure provided for configuration is based on our proprietary module operation. Its functionality is based on W3C recommendations.
Module Operation Fundamentals:
-
Where CORS is enabled, Access-Control-* headers from the origin are always ignored and excluded from the response.
-
Any request without Origin header is not a cross-resource request, and Access-Control-* headers are not transmitted to the client.
-
Our module never adds Access-Control-Request-* headers, since they are incoming request headers generated by the browser, same as Origin.
-
Where there is an Origin header, its contents will be matched against that set by the user. In the absence of restrictions, the Access-Control-Allow-Origin response header will include "*", while where there are any restrictions and where Origin is on the allowed list, then ACAO will include http(s?)://${http_origin}; otherwise, the response will include Access-Control-* headers.
-
Access-Control-Expose-Headers headers are added, if such headers are set by the user. By default, we state a permission to access Content-Range for the operation of range-requests (for JS-based players).
-
Access-Control-Allow-Credentials (ACAC) headers are included in accordance to that set by the user.
-
Access-Control-Allow-Methods, Access-Control-Allow-Headers, and Access-Control-Max-Age headers are included only in a response to a request based on the OPTIONS method, which is processed locally and not forwarded to the origin.
-
Access-Control-Allow-Methods header is set to be equal to the contents of the Access-Control-Request-Method header, if such header is present and is on the list of simple requests (GET, HEAD, POST), or a list set by the user. Where the method is not on the allowed list, then the response will not include Access-Control-* headers. If a request does not contain Access-Control-Request-Method, no Access-Control-Allow-Methods will be set.
-
Access-Control-Allow-Headers is set to be equal to the contents of the Access-Control-Request-Headers header, if such header is present, Access-Control-Request-Method request header is present, and all headers are on the list of simple headers (Accept, Accept-Language, Content-Type, Content-Language) or on the user-set list. Where at least one header is not on the allowed list, then the response will not contain Access-Control-* headers. Where a request does not contain Access-Control-Request-Method and Access-Control-Request-Headers, Access-Control-Allow-Headers will not be stated.
-
Access-Control-Max-Age header will be stated in accordance with that set by the user, but not by default.
-
Any additional response header, specified by the client, will be added/overridden after CORS module processing, while, for example, Access-Control-Allow-Origin: * in header sections will be added irrespective of the CORS module operation results.
Module Configuration Process
CORS verification is active by default. If CORS authorization is disabled, all preflight requests will be forwarded to your origin. The headers, described above and set on the origin, will not be affected and will be transmitted unchanged to end users.
You may adjust the module operation by setting the following parameters:
Allowed Domains (not verified by default, all domains are allowed)
Values may set by either of the following methods:
- example.com – exact match
- *.example.com - all subdomains example.com exclusive of example.com
- .example.com – all Level 3 domains inclusive of example.com
- ~a\d+\.example.com – regular expression
Secure Request Headers
Cache-Control, Content-Language, Content-Type, Expires, Last-Modified, Pragma are allowed by default. You may add your headers to this list.
Upper Level API Accessible Headers (Expose Headers)
Cache-Control, Content-Language, Content-Type, Expires, Last-Modified, Pragma are allowed by default. You may add your headers to this list.
Safe Methods
GET, HEAD, POST are allowed by default. You may add your methods to this list.
Access-Control-Allow-Credentials Header
Cookies, sessions, authorizations are incompatible with caching services due to their operating logic. However, if you need to set an Access-Control-Allow-Credentials header, you can do it.
Preflight Request Response Lifetime
A period of time during which a response to a Preflight request is deemed to be relevant.
Attention!
Irrespective of whether CORS authorization is enabled/disabled and its operation results, you may manually redefine any header for responses to end users. To this end, specify its name and desired value in "Headers" section. Authorization header value will be substituted with that specified by you after the CORS verification stage completion.
Return HTTP Status Code
The Return HTTP Status Code option allows you to define how the CDN responds to client requests.
You can specify the HTTP status code and define either the response body or a redirect, depending on your needs.

Rewrite
The Rewrite function modifies the request URL or path at the CDN level, ensuring that the origin server receives the updated request without requiring changes to the server configuration.
Note
This option is available on request. Please contact your manager.

How It Works - The client sends a request to the CDN at a specific address. - The CDN applies the Rewrite rule to modify the path or parameters. - The modified request is forwarded to the origin server.
Use Cases:
-
Path Rewriting
- Original request: https://cdn.example.com/images/photo.jpg
- Actual path on the server: https://origin.example.com/static/assets/photo.jpg
- The CDN will rewrite /images/photo.jpg to /static/assets/photo.jpg.
-
Adding Parameters
- Client request: https://cdn.example.com/api?query=data
- Transformed request: https://origin.example.com/internal-api?query=data&token=abc123
Advantages
- Hiding the actual server path structure
- Flexible routing management
- Adding service parameters
- Unified access to resources
Brotli Compression $
This option allows you to enable Brotli compression.
Brotli is an open-source, lossless data compression algorithm proposed by Google in 2015. It uses a dictionary with frequently occurring string sequences in text files (e.g., .css, .js), which allows it to achieve on average 20% higher compression rates compared to gzip. It can be enabled for the entire resource or for specific paths through rules in the account interface. It only works over HTTPS.
Compression is possible for the following file types:
- application/javascript
- application/json
- application/vnd.apple.mpegurl
- application/vnd.ms-fontobject
- application/x-font-opentype
- application/x-font-truetype
- application/x-font-ttf
- application/x-javascript
- application/xml
- application/xml+rss
- font/eot - font/opentype
- font/otf - image/svg+xml
- image/vnd.microsoft.icon
- image/x-icon
- text/compressible
- text/css
- text/javascript
- text/xml
For compression to work correctly, the browser must send the header Accept-Encoding: br (supported in browsers based on Chrome 49+, Firefox 44+, Opera 36+).
Rules
This section is designed for more fine-tuned configuration of the CDN network. Individual rules for any section/path allow you to manage headers, caching, CORS, authorization, and other parameters.
Creating a Rule
To create a rule, specify the path to the directory or to a specific file to which this rule should be applied.

Configure rule
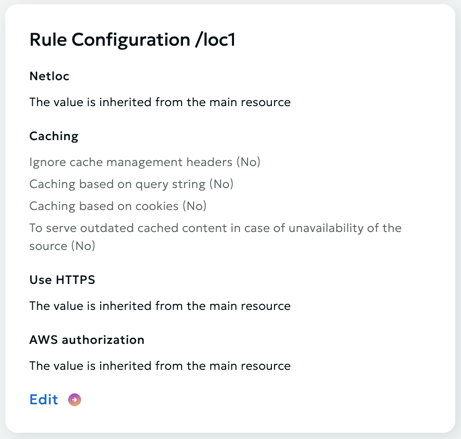
The configuration of the rule is configured similarly to configuration of the entire resource.
Except that you don't have to configure the source when configuring it, because by default it is inherited from the main resource.
Attention
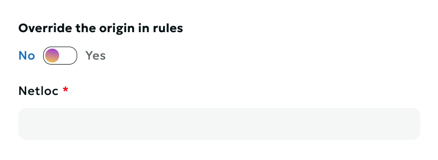
If you want to redefine the source, you need to toggle the value in the upper configuration block.
Timeouts
Timeouts for a specific path (rule) are configured similarly to the option for the entire resource.
Use HTTPS
Use HTTPS for source requests for a specific path (rule) are configured similarly to the option for the entire resource.
Headers
Headers for a specific path (rule) are configured similarly to the option for the entire resource.
Caching
Caching for a specific path (rule) is configured similarly to the option for the entire resource.
Image Optimization
Image optimization for a specific path (rule) is configured similarly to the option for the entire resource.
Video Conversion
Video conversion for a specific path (rule) is configured similarly to the option for the entire resource.
Content Access Restrictions $
Restrictions for a specific path (rule) are configured similarly to the restrictions for the entire resource.
Brotli Compression $
Brotli compression for a specific path (rule) is configured similarly to the option for the entire resource.
CORS Check on CDN Side
CORS check on CDN side for a specific path (rule) is configured similarly to the option for the entire resource.
Return HTTP Status Code
Return HTTP Status code on CDN for a specific path (rule) is configured similarly to the option for the entire resource.
Rewrite
Rewrite on CDN for a specific path (rule) is configured similarly to the option for the entire resource.